
Coming from WebObjects
 I once was very good at building WebApplications and Backends. I used to be a WebObjects (WO) developer. You may have never heard of WebObjects though it basically runs the complete AppStore and several of Apple’s backends for developers. One of my most successful WebObjects solutions was EverLearn, a learning environment for universities. There is still one instance of it running at LMU Munich.
But to deploy WebObjects you have to jump through a whole lot of loops and WebObjects today is not supported with the necessary tools and IDE’s by anyone but some OpenSource guys around Project Wonder which build and maintain eclipse plugins. But working with eclipse…? No it isn’t really fun at all. But there are still guys around who use it.
Hello python & django
- Easy & quick to learn and has some value beyond backend code (Python helps here)
- Easy to maintain & find some support for in a high fidelity community
- Easy & quick to deploy on any kind of box out there
- Deploys also on large scale infrastructures easily (say Google AppEngine)
- Not involving any ruby and ruby on rails stuff (because I hate the syntax of it a lot!)
So I will now describe my journey of how to bootstrap django skills from exactly NO SKILLS at all about python and django. We will see… (BTW you find a nice large django logo here)
Entry vector python
![]() I started on the website called https://www.djangoproject.com/ and searched for some quick guide to start. I found the Quick install guide. I entered
I started on the website called https://www.djangoproject.com/ and searched for some quick guide to start. I found the Quick install guide. I entered man python on my terminal, I recognized that I need to be more specific and I typed again man python2.7 and wow it was already installed and said:
PYTHON(1)
NAME
python – an interpreted, interactive, object-oriented programming languageSYNOPSIS
python [ -B ] [ -d ] [ -E ] [ -h ] [ -i ] [ -m module-name ]
[ -O ] [ -OO ] [ -R ] [ -Q argument ] [ -s ] [ -S ] [ -t ] [ -u ]
[ -v ] [ -V ] [ -W argument ] [ -x ] [ -3 ] [ -? ]
[ -c command | script | – ] [ arguments ]DESCRIPTION
Python is an interpreted, interactive, object-oriented programming language that combines remarkable power with very clear syntax. For an introduction to pro-
gramming in Python you are referred to the Python Tutorial. The Python Library Reference documents built-in and standard types, constants, functions and mod-
ules. Finally, the Python Reference Manual describes the syntax and semantics of the core language in (perhaps too) much detail. (These documents may be
located via the INTERNET RESOURCES below; they may be installed on your system as well.)Python’s basic power can be extended with your own modules written in C or C++. On most systems such modules may be dynamically loaded. Python is also adapt-
able as an extension language for existing applications. See the internal documentation for hints.Documentation for installed Python modules and packages can be viewed by running the pydoc program.
[…]
AUTHOR
The Python Software Foundation: http://www.python.org/psfINTERNET RESOURCES
Main website: http://www.python.org/
Documentation: http://docs.python.org/
Developer resources: http://www.python.org/dev/
Downloads: http://python.org/download/
Module repository: http://pypi.python.org/
Newsgroups: comp.lang.python, comp.lang.python.announce
Installing django (part 1)
I click the link with Install an official release on it. Oh and there we have it again… the stuff that always confuses me in installation procedures. I need to install another tool to beeing able to install django. Installation Inception or Installation Dependency Galore. Anyway I just continue… installing pip which stands for „A tool for installing and managing Python packages.“. Oh and there we have it, the next inception iteration „pip requires setuptools and it has to be installed first, before pip can run.“ yay, who would have thought…
Installing setuptools
okay lets go… I download ez_setup.py which looks to me like a python script which will do the work to install pip? But this is just wild guessing. The red security warning right next to the download link just confuses me. What the heck is a secure download? I only know trustworthy download sources/hosts. I do not know if my curl command is secure I hope so. But should I take the „secure“ install now because I do not know? I have no idea.
I go with the „I hope it is secure approach“ and type into my terminal
curl -O https://bitbucket.org/pypa/setuptools/raw/bootstrap/ez_setup.py
to get the file which should install everything. I enter the following to start installing…
python ez_setup.py
…oh and boy did that not work. Well it seems some ez_setup.py script wanted to install stuff in /Library/Python/2.7/site-packages/ but this is a system directory where you need special privileges. So at this point of the installation quick guide, the instruction manual fails for the first time but yeah I already read the „(which may require administrator access)“ part of the instruction.
Since the only thing residing in that directory is a README, I decide to repeat the action using sudo. Let’s see what happens now…
sudo python ez_setup.py
Wow and that worked. The directory /Library/Python/2.7/site-packages now contains:
-rw-r--r--  1 root  wheel     214 20 Okt 14:51 easy-install.pth

-rw-r--r--  1 root  wheel  481119 20 Okt 14:51 setuptools-1.1.6-py2.7.egg

-rw-r--r--  1 root  wheel      29 20 Okt 14:51 setuptools.pth

-rw-r--r--  1 root  wheel     119 22 Jul  2012 README
Fine so let’s move on…
Installing pip
I should securely download another python script named get-pip.py which I do by typing
curl -O https://raw.github.com/pypa/pip/master/contrib/get-pip.py
Then I should execute that script by typing the following (which may require administrator access)
python get-pip.py so I instead skip this and directly call that with sudo again.
sudo python get-pip.py
In this process I need to give LittleSnitch clearance for connecting to some python resource server called pypi.python.org. Since it is some .org thingy I trust it to do what is needed. It downloads pip-1.4.1.tar.gz and several seconds later it states
[…]

Installing pip script to /usr/local/bin

Installing pip-2.7 script to /usr/local/bin

Successfully installed pip
So I suppose pip is now ready to be used. Since it was installed in /usr/local/bin it may easily be started from my terminal. So I leave http://www.pip-installer.org/en/latest/installing.html to get back to the django installation guide…
Installing django (part 2)
The guide says „If you’re using Linux, Mac OS X or some other flavor of Unix, enter the command sudo pip install Django at the shell prompt“ and that is what I will do now… I type…
sudo pip install Django
Oh well… It downloads roughly 8 MB of an archive called Django-1.5.4.tar.gz and several seconds later I read:
Downloading/unpacking Django

  Downloading Django-1.5.4.tar.gz (8.1MB): 8.1MB downloaded

  Running setup.py egg_info for package Django
warning: no previously-included files matching '__pycache__' found under directory '*'
warning: no previously-included files matching '*.py[co]' found under directory '*'
Installing collected packages: Django
Running setup.py install for Django
changing mode of build/scripts-2.7/django-admin.py from 644 to 755
warning: no previously-included files matching '__pycache__' found under directory '*'
warning: no previously-included files matching '*.py[co]' found under directory '*'
changing mode of /usr/local/bin/django-admin.py to 755
Successfully installed Django
Cleaning up...
I hope these warnings are shown because this is my first installation. Looks like I now have a django-admin.py sitting in my /usr/local/bin/ we will see what this is good for.
But where to go now? The installation guide just does not tell me if I am done already. I reread the part which is headlined with „Installing an official release with pip“ but I don not see any hints what to do now.
I conclude, I am done with installation.
I’ve installed things, what now?
Hmm, I search the site for any hint… returning to the installation intro I find a part of text headlined „Verifying“ and it says „To verify that Django can be seen by Python, type python from your shell. Then at the Python prompt, try to import Django“.
Okay so I type python to get into python’s Python 2.7.2 interactive shell.
I type import django and nothing seems to happen. Then I type print(django.get_version()) and now I see:
>>> import django

>>> print(django.get_version())

1.5.4

>>>
This looks like i was successful in installing stuff. And I have a feeling that all this stuff just involved python itself which was preinstalled on my Mac already. So the only dependency seems to by python which makes me smile a bit. I like that! Reading „That’s it – you can now move onto the tutorial.“ I continue my voyage to a new country…
The tutorial (part 1)
Quickly scanning the first tutorial page I see some trouble ahead… I am quite sure that I will need to tackle problems with setting up stuff for mySQL-database activities to work for django. I have not yet configured anything for this to work, so I await some trouble here… but let’s see how far we get in this tutorial…
First thing I learn is that I can execute django stuff from the terminal just by typing
python -c "import django; print(django.get_version())"
without the need to before move into interactive python shell mode. That’s quite practical, but more specific to the python stuff I guess.
Going IRC…
At this point in time I wanted to get some advice from experts, so I entered the #django-channel on irc.freenode.net and asked for some help. I should have done this up front. But in seconds I got a very helpful advice.
Go and google for vagrant and Google for Kenneth Love which I did!
Skip all steps above and go Vagrant?
![]() Yeah this looks like exactly what I really was searching for: A new powerhouse for easy webapp development. At the same time googleing for „Kenneth Love“ just revealed some videos to me which are produced by Kenneth Love (kind of an expert and promoter on django) and which display he is actually working on setting up resources which teach people about django on the site http://gettingstartedwithdjango.com/.
Yeah this looks like exactly what I really was searching for: A new powerhouse for easy webapp development. At the same time googleing for „Kenneth Love“ just revealed some videos to me which are produced by Kenneth Love (kind of an expert and promoter on django) and which display he is actually working on setting up resources which teach people about django on the site http://gettingstartedwithdjango.com/.
Now visiting his site displays which agenda I should have followed right from the beginning:
You’ve completed (at least most of) Learn Python the Hard Way.
This implies you also:
- Have a terminal you’re comfortable with.
- Have a text editor you like.
- You’ve completed the official Django tutorial, also known as the Polls tutorial.
- You’ve installed both Vagrant and VirtualBox.
- You’ve downloaded the VM.
Hmm I am confused. But I think I should rather continue with the tutorial. Do not let distraction get into control.
The tutorial (part 2)
So to be a bit better prepared what will come in this tutorial I just started doing the exercises at http://learnpythonthehardway.org/ … at least I completed the first 10 exercises. With some pauses! Hey it was sunday. ;-)
-rw-r--r--  1 jollyjinx  staff    42 20 Okt 23:12 ex10.py

-rw-r--r--  1 jollyjinx  staff   310 20 Okt 22:53 ex9.py

-rw-r--r--  1 jollyjinx  staff   465 20 Okt 22:38 ex8.py

-rw-r--r--  1 jollyjinx  staff   430 20 Okt 22:30 ex7.py

-rw-r--r--  1 jollyjinx  staff   438 20 Okt 22:17 ex6.py

-rw-r--r--  1 jollyjinx  staff   728 20 Okt 20:42 ex5.py

-rw-r--r--  1 jollyjinx  staff  1072 20 Okt 20:39 ex4.py

-rw-r--r--  1 jollyjinx  staff  1185 20 Okt 18:47 ex3.py

-rw-r--r--  1 jollyjinx  staff   248 20 Okt 18:22 ex2.py

-rw-r--r--  1 jollyjinx  staff   260 20 Okt 18:14 ex1.py
Mostly those first 10 exercises dealt with string assembly string formatting and escaping and string output. Also a little bit about variables and basic var types but not too much. Pretty simple stuff, but it needs time nevertheless to execute the exercises and really grab the content. During my exercises I googled for some python documentation on string formatting which is pretty much similar to the one in Objective-C. Actually I used SiteSucker to download the content of http://learnpythonthehardway.org/book/ but please don’t tell anyone.
So now I felt a bit better prepared to continue on the Tutorial on the part with the headline „Creating a project“. So I just created a directory projects where I would store all test projects for my learning on django. Then I went into that dir and typed
django-admin.py startproject mysite
Nothing seemed to have happened, but… a quick
ls -LR
revealed the new created structure of the project just created:
mysite

./mysite:
manage.py	mysite

./mysite/mysite:
__init__.py	settings.py	urls.py		wsgi.py
So actually one new directory named after the project name which has a manage.py and a subdirectory having 4 other python scripts inside. Nice. What now? Now I was ready to run my first python app. Yay.
python manage.py runserver brought it to life!
First light
After hours of stuff and learning I actually got my first web app running, what a great feeling.
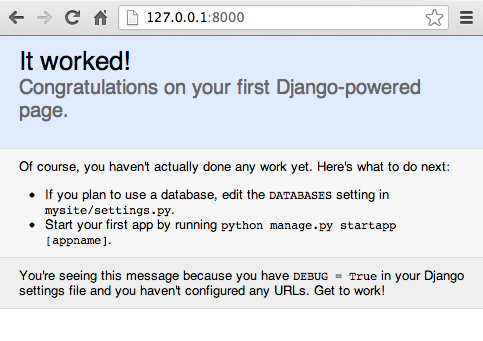
First website which runs django on my machine
I think the statement of „Of course, you haven’t actually done any work yet.“ could not be more wrong at this point of my progress. I have done A LOT OF WORK to get here. But that’s how hardcore coders seem to have a different perspective on the world, they just don’t consider all the setup, documentation reading, googling, IRC-connecting, python learning, tutorial execution as WORK, but I DO! If you fail on these first pretty time consuming steps you won’t get anywhere near this first django website. So, thank you for my work which brought me to my first django powered site! (someone has to say that! and I will prevail!)
Let’s move on to Level 2: Database connection
Okay, I started editing the settings file in my django project. Then opened my mySQL database manager CocoaMySQL and created a new DB just for this tutorial. My DB config now looks like this:
DATABASES = {

    'default': {

        'ENGINE': 'django.db.backends.mysql', # Add 'postgresql_psycopg2', 'mysql', 'sqlite3' or 'oracle'.

        'NAME': 'py_mysite_db',          # Or path to database file if using sqlite3.

        # The following settings are not used with sqlite3:

        'USER': 'root',

        'PASSWORD': '',

        'HOST': '',                      # Empty for localhost through domain sockets or '127.0.0.1' for localhost through TCP.

        'PORT': '',                      # Set to empty string for default.

    }

}
But that did not work, though I have configured everything that system was not able to connect to my mySQL database including the correct port. Doing a quick googleing on that I found that others alos have this error:
django.core.exceptions.ImproperlyConfigured: Error loading MySQLdb module: No module named MySQLdb on stackoverflow.
Installing mySQL support via pip
I needed to install the missing mySQL module which was missing from the python site-packages. So I typed
sudo pip install mysql-python
I saw some downloading, and then several warnings and finally some „Successfully installed mysql-python“. Okay let’s hope this works now! I knew that this would bring trouble… databases and code connecting to them… always a PITA. Everywhere! In the meantime I tried the sqlite3 option which worked on the first try, but I want the mySQL I know and use also for my blog installation to be used. I know how to deal with a mySQL and want to reuse that knowledge.
Okay the next try wasn’t any more successful.
  File "/Library/Python/2.7/site-packages/django/db/backends/mysql/base.py", line 17, in <module>

    raise ImproperlyConfigured("Error loading MySQLdb module: %s" % e)

django.core.exceptions.ImproperlyConfigured: Error loading MySQLdb module: dlopen(/Library/Python/2.7/site-packages/_mysql.so, 2): Library not loaded: libmysqlclient.18.dylib

  Referenced from: /Library/Python/2.7/site-packages/_mysql.so

  Reason: image not found
Looks like connecting a DB will be a PITA under python too. It’s a fragile connection every single time. I have never seen this work on the first or the second try under any language.
I give up for the moment. But the stackoverflow entry has some advice on how to make it work with a lot of other PITA and statements like „Just to add to other answers, if you’re using Django, it is advisable that you install mysql-python BEFORE installing Django.“ really make me cry.
Someone on IRC said to me I had to reinstall mySQL, yeah sure. No way I will reinstall it it works for wordpress, so it will be good for django.
Another advice was to check the PYTHONPATH and there we have it again… stuff that nowhere is mentioned or explaned accurately. But what exactly is PYTHONPATH? Documentation says following:
Augment the default search path for module files. The format is the same as
the shell’s PATH: one or more directory pathnames separated by
os.pathsep (e.g. colons on Unix or semicolons on Windows).
Non-existent directories are silently ignored.
In addition to normal directories, individual PYTHONPATH entries
may refer to zipfiles containing pure Python modules (in either source or
compiled form). Extension modules cannot be imported from zipfiles.
The default search path is installation dependent, but generally begins with
prefix/lib/pythonversion (see PYTHONHOME above). It
is always appended to PYTHONPATH.
An additional directory will be inserted in the search path in front of
PYTHONPATH as described above under
Interface options. The search path can be manipulated from
within a Python program as the variable sys.path.
The The Module Search Path
You cannot live and work with django without the The Module Search Path. But do you get it from reading this explanation? This sounds like a lot of nerdspeak to me.
6.1.2. The Module Search Path
When a module named spam is imported, the interpreter first searches for
a built-in module with that name. If not found, it then searches for a file
named spam.py in a list of directories given by the variable
sys.path. sys.path is initialized from these locations:
- the directory containing the input script (or the current directory).
- PYTHONPATH (a list of directory names, with the same syntax as the
shell variable PATH). - the installation-dependent default.
After initialization, Python programs can modify sys.path. The
directory containing the script being run is placed at the beginning of the
search path, ahead of the standard library path. This means that scripts in that
directory will be loaded instead of modules of the same name in the library
directory. This is an error unless the replacement is intended. See section
Standard Modules for more information.
Are you any wiser now? Me not! It’s like parents explaining sex to their children, that’s how this documentation explains the PYTHONPATH. It’s based on too much social convention and pre-existing knowledge. It’s misleading to me and not helping at all solving my database problem.
The big question remains, WHAT exactly is the PYTHONPATH and where do I set it, and which value does it need for my environment on the Mac to actually work? Since I have no answer to this and Google does not have a specific recommendation either… I skip this and go with the sqlite3 which runs out of the box.
First connect using sqlite3
The good thing is you can call python manage.py syncdb as often as you like. So I continued with the tutorial until I hit a road block on the def __unicode__(self): stuff. Because nowhere in the tutorial there is explained that actually you have to correctly indent stuff.
IndentationError: expected an indented block (models.py, line 14) will otherwise cross your console display.
Those import-statements like from django.utils import timezone really woke memories to my java.util.* classes I used when working with WebObjects. It is still funny that those basic things do not yet belong to the default lego set of something like django.
I got my Polls model up and was now doing exercise in the interactive python shell. I created objects, deleted them, counted them and filtered them. That was really a quite convenient experience I must say. It was way more convenient than what I did in Java long time ago. It really started be fun. But I still had none of these objects displayed on a website or so. So I went for part 2 of the tutorial.
Writing your first Django app, part 2 (of 6)
The good thing was, I already had mastered part 1, the bad thing, still 5 parts to complete. But at least I was able to do something by switching to the sqlite3 instead of getting frustrated with mySQL connection. I think I will complete on the whole tutorial just going with the sqlite3 and after all that stuff maybe I know enough to fix this mySQL mess.
Part 2 gives some insight in how django came to life:
Django was written in a newsroom environment, with a very clear separation between “content publishers” and the “public” site. Site managers use the system to add news stories, events, sports scores, etc., and that content is displayed on the public site.
This is good news to me, because one of my main use cases I wanna execute with django is something that also is content related. Perhaps django’s roots will help me here!
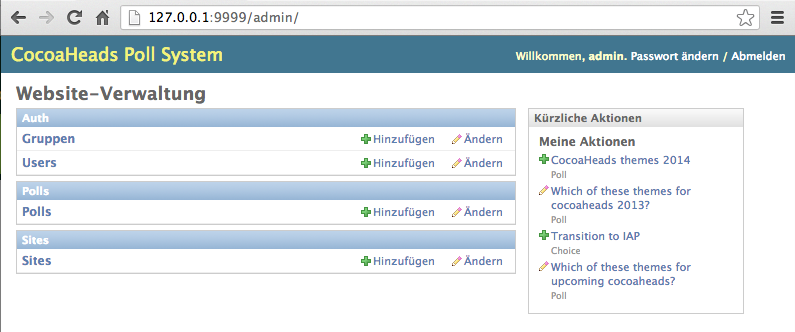
Activating the admin site did not work as expected. I got a failed webapplication instead.
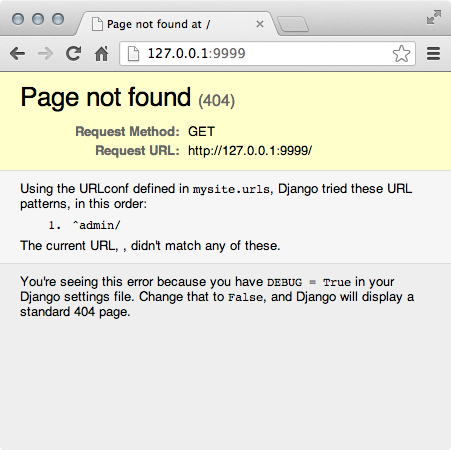
There must be something I have missed. But where to search for the cause..? Double checking on the tutorial revealed: http://127.0.0.1:9999/admin/ needed to be opened for this to work. So I just forgot to append „/admin/“.
So now I was successful.
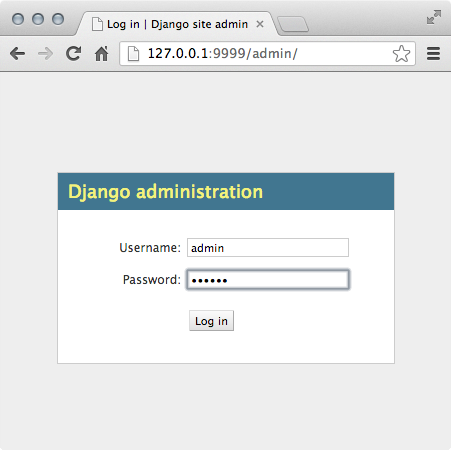
And after typing my userid and password (which I setup in part 1 of the tutorial) I saw:
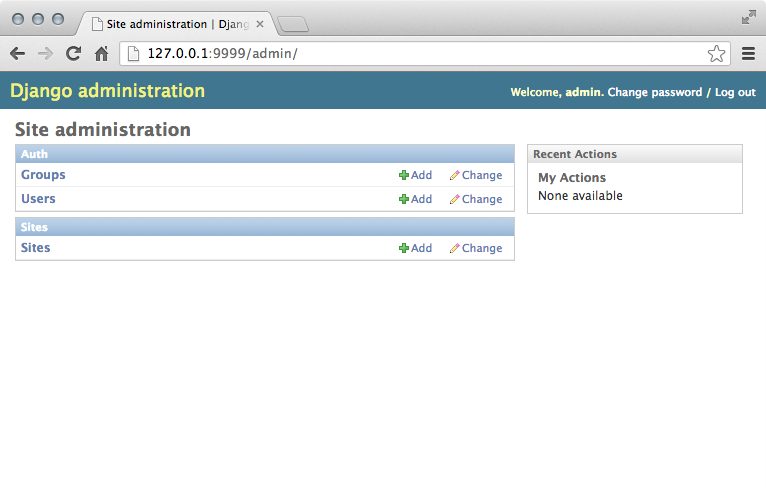
Yay!
One error I often repeated until now was always missing on the „:“ after the line of a class definition. That’s something I still need to learn.
Well… stuff became more and more fun… I just worked through part 2 and customized the admin interface of the Polls app. The next big issue was just to find out where the template files of the default django admin interface were stored. After some lookup here in my blog post I found it easily and made a copy of the base site html into my fresh created templates directory:
cp /Library/Python/2.7/site-packages/django/contrib/admin/templates/admin/base_site.html .
Waaahaaa, „Where are the Django source files?“ explanantion coming too late. Boooo! But good to know if I will ever develop on the machine of someone else. But since One-liners of python seem to be difficult to construct… this one will for sure not be at hand when needed. There is no way to teach my bash to execute this line other than putting the stuff in a shell-script file. Which actually worked and looked like this:
python -c "import sys

sys.path = sys.path[1:]

import django

djangoPath = django.__path__[0]

outputString = 'Django is installed at: %s' % djangoPath

print(outputString)"
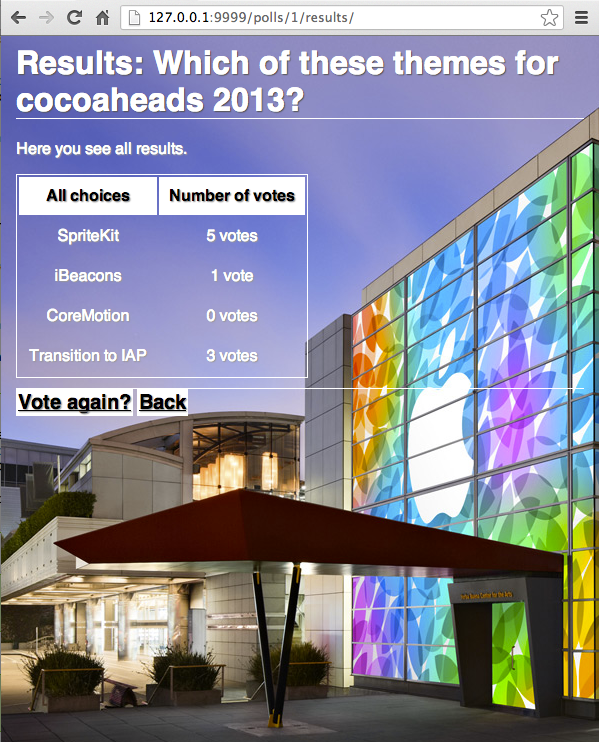
Okay, several edits later and tinkering with the templates I managed to switch the whole web-app to german language and manipulated the CSS a little bit, too. I intuitively got the concept. And what is amazing is that intuitively I found the relevant entries in the settings to switch stuff. Great!
My web app now looked like this:
Tutorial part 3 (of 6)
Yeah I got the part 2 done. And I am not yet fed up with it. Not even a little bit. That is a good sign. So let’s go on…
Okay, while writing all these URL mappers and views I ran into the issue that I used a special char during my commenting on all this stuff in code. Lesson learned, I now add following line to the top of all my python files.
# -*- coding: utf-8 -*-
Sometimes I really ask myself, how many years have to pass for UTF-8 to be the default. Boy do we have innovation in computer programming languages?
Yeah, several views and tweaks later, I got my app in a state where it now has a custom url-namespace for the polls app and it has some nice custom views for displaying index and details of the polls. I tinkered a bit with the views to do what I want and I am overall satisfied with the result.
Tutorial part 4
Okay, lots of lines of code for vews and templates later… I grabbed the concept of generic views. Fine. Now show me what kind of ready made generic Views are there already to be used by me?
Actually part 4 really was still a feeling of dizzyness of understanding. But things become clear the more I tweak stuff, so in part 5 I will make „Tweaking“ my basic strategy of understanding. I need to get this!
Tutorial part 5
Uh, oh, testing. Until now I was like… no tests. But seems like a good starting point using testing on a new language and lego set to ensure everything works. So let’s get to work…
Q: „So why create tests, and why now?“ and A: „Tests will save you time“ and „Code without tests is broken by design.“ – Okay shut up and take my m… eh time and teach me.
Okay, test are a PITA as expected. You feel like a dumbass to actually check the order of entries returned by a method. But well…
…in the end I wrote more code on test than anything else. During interactive testing I recognized that unix environment vars again have a huge impact on stuff. Especially the line
export DJANGO_SETTINGS_MODULE=mysite.settings
helps a lot and there are A LOT more! I really need an update on these unix var thingys I never got that really to feel safe and sound. Only did the minimum by adding stuff to my bash-profile using EXPORT commands.
<rant>But the impact of these vars is really huge and can demolish everything you do at any time! I think this stuff should be much better protected. It’s mor like an endless pasteboard than anything. Someone should monitor all the changes to unix env vars… it’s that bad.
I HATE THESE UNIX ENV VARS AND WHEN SOMEONE CHANGES THEM BEHIND MY BACK!
FUCKTARDS GO CRASH YOUR OWN UNIX. AND NEVER TOUCH MY ENV VARS AGAIN!
</rant>
But hey typing python manage.py test polls now is like second nature to me. I learned!
Late after midnight, part 6 of 6
I could not resist and wanted to complete the tutorial. So I went after the „Customize your app’s look and feel“ a step in my work process I always like best.
Adding some static resources like CSS and images was easy. Understanding the sophisticated search-strategy for static resources was a bit like trying to understand magic. But this seems more like something I will learn soon anyway by tinkering around to build reusable components/apps thats what I am interested in the most. So „Static file namespacing“ will become an important part, because I want to do small reusable things. That’s what worked best when I was still doing WebObjects. Components were the most powerful feature of WebObjects, and the strict split between logic and templates. The template-engine of WebObjects was one of the most logical and powerful I have seen.
I hope I can get anywhere near that reusability of components like I once experienced that in WebObjects. I hope python/django will deliver on this thing.
So tinkering after midnight (while still under the impression of the Apple Keynote for the iPad Air; which inspired me to use the frontpage of apple as my tinkering background image) left me with this fine piece of crafted poll app:
So I consider myself now as „unchained“.

Let’s recap where I am now:
CHECK (at least 24 of 52; will keep goin‘ buddy)
This implies you also:
Have a terminal you’re comfortable with.
CHECK (Did all in two Terminal windows using vi)Have a text editor you like.
CHECK (I like vi)You’ve completed the official Django tutorial, also known as the Polls tutorial.
CHECK (Did all 6 parts!)- You’ve installed both Vagrant and VirtualBox.
- You’ve downloaded the VM.
The journey continues…
next I will try to deploy the stuff somewhere and get my mySQL goin‘ with django which was an issue while setting up the environment for the tutorial. So by now I did everything using an sqlite3 which worked pretty well.
I found a really good documentation it’s called „The Hitchhiker’s Guide to Python!“ (basically in a git-repo).
Try to deploy
Okay, if you have a quick look at the deployment stuff available on the web you get the impression, that you should use a procedure called Web Server Gateway Interface (WSGI).
It is a specification for web servers and application servers to communicate with web applications.
Fine. My first guess, none of my existing hosters will support this by default. Looks kind of exotic to me. But much to my surprise there does exist a mod_wsgi for Apache (the webserver I know best). Oh and there is documentation available which explains How to use Django with Apache and mod_wsgi. Great!
Deploying Django with Apache and mod_wsgi is a tried and tested way to get Django into production.
But since that is all stuff you do not deal with everyday I just did some extensive googling oon that and came up with these two helpful resources (choosing resource 1 to follow):
- Mountain Lion, Django, Apache, mod_wsgi and Postgresql
- Build and Deploy a Django Project on OSX from Scratch
![]() Since I got the advice to go with postgres instead of any mySQL if I want to deploy into production (which is why I am going through all this right now), I am interested in installing postgres now. I will use postgres.app for this. It’s downloading a 33 MB stuff for postgres and comes as app, how cool is that? You simply start it and it listens to default port 5432 and sits on the menubar as long as you quit it. Great! No compiling now installing, now endless commandline voodoo and unix env var wars. It. Just. Works. Thanks to those who made this app, big thanks!
Since I got the advice to go with postgres instead of any mySQL if I want to deploy into production (which is why I am going through all this right now), I am interested in installing postgres now. I will use postgres.app for this. It’s downloading a 33 MB stuff for postgres and comes as app, how cool is that? You simply start it and it listens to default port 5432 and sits on the menubar as long as you quit it. Great! No compiling now installing, now endless commandline voodoo and unix env var wars. It. Just. Works. Thanks to those who made this app, big thanks!
Postgres.app is the easiest way to get started with PostgreSQL on the Mac. Open the app, and you have a PostgreSQL server ready and awaiting new connections. Close the app, and the server shuts down.
So this turns out to be actually true! Wow! I just download an update for my pgAdmin3 which already resides in the Apps but is quite dated (from 2010). While the dated version does throw a lot of errors on connecting, the new version behaves quite well. So I guess I have a postgres to use now and the tools to inspect it. After adding the search path to my shell-.profile I feel well prepared.
Entering psql gives me
psql (9.3.0)

Type "help" for help.

jollyjinx=#
Yay! It just works! This is great. And the documentation which comes with postgresapp is awesome. Also getting it from the menu at any time is awesome.
Installing mod_wsgi in Apache (on OS X Mountain Lion)
Okay, to get the wsgi_mod I will need some stuff Apple did not preinstall on OS X. So installing homebrew by typing:
ruby -e "$(curl -fsSL https://raw.github.com/mxcl/homebrew/go)"
Entering brew doctor reveals issues with my already used macports stuff. Perhaps I should try to install mod_wsgi via macports… hmm…
Courageous as i am, I just type:
sudo port install mod_wsgi after I found that module in the ports list.
I get a whole bunch of stuff installed (dependency inception galore again)…
--->  Computing dependencies for mod_wsgi
--->  Dependencies to be installed: apache2 apr apr-util pcre python26
--->  Fetching archive for apr
Warning: Your DNS servers incorrectly claim to know the address of nonexistent hosts. This may cause checksum mismatches for some ports.
--->  Attempting to fetch apr-1.4.8_0.darwin_12.x86_64.tbz2 from http://mse.uk.packages.macports.org/sites/packages.macports.org/apr
--->  Attempting to fetch apr-1.4.8_0.darwin_12.x86_64.tbz2.rmd160 from http://mse.uk.packages.macports.org/sites/packages.macports.org/apr
--->  Installing apr @1.4.8_0
--->  Activating apr @1.4.8_0
--->  Cleaning apr
--->  Fetching archive for apr-util
--->  Attempting to fetch apr-util-1.5.2_1.darwin_12.x86_64.tbz2 from http://mse.uk.packages.macports.org/sites/packages.macports.org/apr-util
--->  Attempting to fetch apr-util-1.5.2_1.darwin_12.x86_64.tbz2.rmd160 from http://mse.uk.packages.macports.org/sites/packages.macports.org/apr-util
--->  Installing apr-util @1.5.2_1
--->  Activating apr-util @1.5.2_1
--->  Cleaning apr-util
--->  Fetching archive for pcre
--->  Attempting to fetch pcre-8.33_0.darwin_12.x86_64.tbz2 from http://mse.uk.packages.macports.org/sites/packages.macports.org/pcre
--->  Attempting to fetch pcre-8.33_0.darwin_12.x86_64.tbz2.rmd160 from http://mse.uk.packages.macports.org/sites/packages.macports.org/pcre
--->  Installing pcre @8.33_0
--->  Activating pcre @8.33_0
--->  Cleaning pcre
--->  Fetching archive for apache2
--->  Attempting to fetch apache2-2.2.25_0+preforkmpm.darwin_12.x86_64.tbz2 from http://mse.uk.packages.macports.org/sites/packages.macports.org/apache2
--->  Attempting to fetch apache2-2.2.25_0+preforkmpm.darwin_12.x86_64.tbz2.rmd160 from http://mse.uk.packages.macports.org/sites/packages.macports.org/apache2
--->  Installing apache2 @2.2.25_0+preforkmpm
--->  Activating apache2 @2.2.25_0+preforkmpm
--->  Cleaning apache2
--->  Fetching archive for python26
--->  Attempting to fetch python26-2.6.8_0.darwin_12.x86_64.tbz2 from http://mse.uk.packages.macports.org/sites/packages.macports.org/python26
--->  Attempting to fetch python26-2.6.8_0.darwin_12.x86_64.tbz2.rmd160 from http://mse.uk.packages.macports.org/sites/packages.macports.org/python26
--->  Installing python26 @2.6.8_0
--->  Activating python26 @2.6.8_0

To make python 2.6 the default (i.e. the version you get when you run 'python'), please run:

sudo port select --set python python26

--->  Cleaning python26
--->  Fetching archive for mod_wsgi
--->  Attempting to fetch mod_wsgi-3.3_0+python26.darwin_12.x86_64.tbz2 from http://mse.uk.packages.macports.org/sites/packages.macports.org/mod_wsgi
--->  Attempting to fetch mod_wsgi-3.3_0+python26.darwin_12.x86_64.tbz2.rmd160 from http://mse.uk.packages.macports.org/sites/packages.macports.org/mod_wsgi
--->  Installing mod_wsgi @3.3_0+python26
########################################################
# To enable mod_wsgi add
#  LoadModule wsgi_module modules/mod_wsgi.so
# to your apache2 config file:
#  /opt/local/apache2/conf/httpd.conf
########################################################
--->  Activating mod_wsgi @3.3_0+python26
--->  Cleaning mod_wsgi
--->  Updating database of binaries: 100.0%
--->  Scanning binaries for linking errors: 100.0%
--->  No broken files found.
So I got installed „apache2“, „apr“, „apr-util“, „pcre“, „python26″… hmm… I already HAD apache2 installed. And I already had a Python 2.7.2 installed. Hmm. This does look weird. Looks like a valid wsgi-install is only possible with python 2.6. So perhaps I should activate the python 2.6 installation?
I think it is no risk to switch to python26. So I type…
sudo port select --set python python26 which activates it and gives me Python 2.6.8 in a new shell window. hmm, okay.
A quick check if the existing apache2-Installation survived the ports-hoolahoop… by typing:
sudo apachectl restart reveals it still works. Fine, did not expect that.
I suppose I am set for using mod_wsgi in apache now (need to activate the module inside the httpd.config somewhere I suppose). We will see..
George Irwin writes in his blog post:
Now for the fiddly stuff. In short, you need to setup apache to serve your Django app (with the help of mod_wsgi).
That sounds inviting… #NOT. Anyway, I have to go through this loop at least once, before I can host stuff at some hoster around the corner. i need to figure out how much of work is needed to deploy this stuff anywhere e.g. at djangoeurope.com/.
Now the excellent explanantion how to set things up with Apache is on my agenda. Perhaps i should take a short break before I go through this… *BREAK*
I really got frustrated in the process of using wsgi_mod and did not get it to work in my apache setup, though I configured everything as described it still revealed a server error 500. So instead I went out to http://www.ibm.com/developerworks/web/library/os-django/ and tried to configure my apache to run with mod_python though all these django experts tell you „Hey, that’s not the way you should do it! We will drop support for mod_python in django 1.9 and it is deprecated.“ yeah, than make it easier to setup guys!
I really tried it a lot but still got these errors on apache:
> more error_log

[Thu Oct 24 21:33:14 2013] [warn] Init: Session Cache is not configured [hint: SSLSessionCache]

[Thu Oct 24 21:33:14 2013] [notice] Digest: generating secret for digest authentication ...

[Thu Oct 24 21:33:14 2013] [notice] Digest: done

[Thu Oct 24 21:33:14 2013] [notice] Apache/2.2.24 (Unix) DAV/2 mod_wsgi/3.3 Python/2.6.8 PHP/5.3.26 mod_ssl/2.2.24 OpenSSL/0.9.8y configured -- resuming normal operations

[Thu Oct 24 21:33:22 2013] [error] [client 127.0.0.1] File does not exist: /Library/WebServer/Documents/favicon.ico

[Thu Oct 24 21:33:28 2013] [error] [client 127.0.0.1] mod_wsgi (pid=93168): Target WSGI script '/Users/jollyjinx/djangodev/projects/mysite/mysite/wsgi.py' cannot be loaded as Python module.

[Thu Oct 24 21:33:28 2013] [error] [client 127.0.0.1] mod_wsgi (pid=93168): Exception occurred processing WSGI script '/Users/jollyjinx/djangodev/projects/mysite/mysite/wsgi.py'.

[Thu Oct 24 21:33:28 2013] [error] [client 127.0.0.1] Traceback (most recent call last):

[Thu Oct 24 21:33:28 2013] [error] [client 127.0.0.1]   File "/Users/jollyjinx/djangodev/projects/mysite/mysite/wsgi.py", line 27, in

[Thu Oct 24 21:33:28 2013] [error] [client 127.0.0.1]     from django.core.wsgi import get_wsgi_application

[Thu Oct 24 21:33:28 2013] [error] [client 127.0.0.1] ImportError: No module named django.core.wsgi

[Thu Oct 24 21:33:28 2013] [error] [client 127.0.0.1] File does not exist: /Library/WebServer/Documents/favicon.ico

[Thu Oct 24 21:33:30 2013] [error] [client 127.0.0.1] mod_wsgi (pid=93165): Target WSGI script '/Users/jollyjinx/djangodev/projects/mysite/mysite/wsgi.py' cannot be loaded as Python module.

[Thu Oct 24 21:33:30 2013] [error] [client 127.0.0.1] mod_wsgi (pid=93165): Exception occurred processing WSGI script '/Users/jollyjinx/djangodev/projects/mysite/mysite/wsgi.py'.

[Thu Oct 24 21:33:30 2013] [error] [client 127.0.0.1] Traceback (most recent call last):

[Thu Oct 24 21:33:30 2013] [error] [client 127.0.0.1]   File "/Users/jollyjinx/djangodev/projects/mysite/mysite/wsgi.py", line 27, in

[Thu Oct 24 21:33:30 2013] [error] [client 127.0.0.1]     from django.core.wsgi import get_wsgi_application

[Thu Oct 24 21:33:30 2013] [error] [client 127.0.0.1] ImportError: No module named django.core.wsgi

[Thu Oct 24 21:33:30 2013] [error] [client 127.0.0.1] File does not exist: /Library/WebServer/Documents/favicon.ico
My reasoning with this was… why does it use Python/2.6.8 though I switched back already to 2.7.3?
So I installed python_select via macports bc. I read this.
sudo port install python_select
Wow and then I really got near to cry out loud look at this mess:
> port select --list python
Available versions for python:
	none
	python25-apple
	python26
	python26-apple
	python27 (active)
	python27-apple
Meanwhile the test.py I threw in /Library/WebServer/CGI-Executables executed pretty fine.
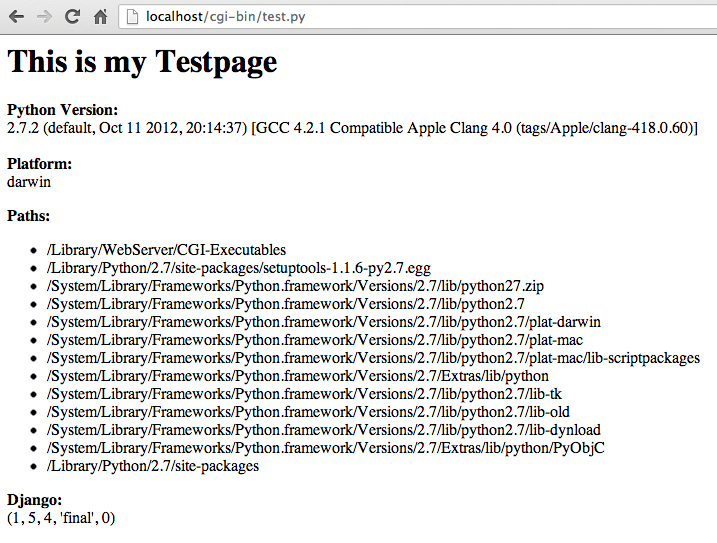
This was the code of my test.py:
#!/usr/bin/python
import sys
python_paths = sys.path
python_platform = sys.platform
python_version = sys.version
print "Content-type: text/html"
print
print "<html><head>"
print ""
print "</head><body>"
print "<h1>This is my Testpage</h1>"
print "<p><b>Python Version:</b><br>%s<br><br><b>Platform:</b><br>%s</p>" % (python_version, python_platform)
print "<p><b>Paths:</b><ul>"
for current_path in python_paths:
print "<li>%s</li>" % current_path
print "</ul></p>"
print "<p><b>Django:</b><br>"
try:
import django
except:
print "Error: Framework not installed!"
else:
print django.VERSION
print "</p>"
print "</body></html>"
Actually this is all a huge mess! Even using this CheckingYourInstallation-procedure did not really help. I have no idea how to handle the mod_wsgi.so. This all sucks. on the one hand the direct python execution in my cgi-bin directory works like a charme and can even see django. On the other the damned mod_wsgi module does not get where to find django.core.wsgi??? Huge fail I say!
So again… going mod_python now…
And again I read:
Unless you are planning on going to production with OS X you might not want to bother. If you must do it, go straight to mod_wsgi. Don’t bother with mod_python or older solutions. I did mod_python on Apache and while it runs great now, it took countless hours to set up.
…so not doing mod_python, I did not find the module anywhere, not in the default modules directory of apache, and not anywhere else. So…
…I suppose I will now go ALL IN on VAGRANT and Virtualbox. I am fed up with it.
I want a virtual machine which has the production environment I WANT and not a rotten to the core mess of a thousand python versions on ONE unix box alone where every version is coupled with something different. Apple shame on you creating such a mess of different python distributions even on ONE machine by default.
Installing VirtualBox & Vagrant
> vagrant up

Bringing machine 'default' up with 'virtualbox' provider...

[default] Box 'precise32' was not found. Fetching box from specified URL for

the provider 'virtualbox'. Note that if the URL does not have

a box for this provider, you should interrupt Vagrant now and add

the box yourself. Otherwise Vagrant will attempt to download the

full box prior to discovering this error.

Downloading or copying the box...

Extracting box...te: 3706k/s, Estimated time remaining: 0:00:01)

Successfully added box 'precise32' with provider 'virtualbox'!

[default] Importing base box 'precise32'...

[default] Matching MAC address for NAT networking...

[default] Setting the name of the VM...

[default] Clearing any previously set forwarded ports...

[default] Creating shared folders metadata...

[default] Clearing any previously set network interfaces...

[default] Preparing network interfaces based on configuration...

[default] Forwarding ports...

[default] -- 22 => 2222 (adapter 1)

[default] Booting VM...

[default] Waiting for machine to boot. This may take a few minutes...

[default] Machine booted and ready!

[default] The guest additions on this VM do not match the installed version of

VirtualBox! In most cases this is fine, but in rare cases it can

cause things such as shared folders to not work properly. If you see

shared folder errors, please update the guest additions within the

virtual machine and reload your VM.
Guest Additions Version: 4.2.0
VirtualBox Version: 4.3
[default] Mounting shared folders...
[default] -- /vagrant
And one line later…
> vagrant ssh

Welcome to Ubuntu 12.04 LTS (GNU/Linux 3.2.0-23-generic-pae i686)
* Documentation: https://help.ubuntu.com/
Welcome to your Vagrant-built virtual machine.
Last login: Fri Sep 14 06:22:31 2012 from 10.0.2.2
okay now we have a virtual machine running Ubuntu 12.04 and vagrant as a kind of management tool for this machine. Let’s see how far this will bring me further to my goal of simple deployment of django/python projects for production.
This piece of text in the vagrant help docs made me smile:
Take a moment to think what just happened: With just one line of configuration and one command in your terminal, we brought up a fully functional, SSH accessible virtual machine. Cool.
Time to check back on my requirements:
CHECK (at least 24 of 52; will keep goin‘ buddy)
This implies you also:
Have a terminal you’re comfortable with.
CHECK (Did all in two Terminal windows using vi)Have a text editor you like.
CHECK (I like vi)You’ve completed the official Django tutorial, also known as the Polls tutorial.
CHECK (Did all 6 parts! And a lot of voodoo around wsgi_mod that did not work.)You’ve installed both Vagrant and VirtualBox.
CHECK installed and up and runningYou’ve downloaded the VM.
CHECK I have actually already 2 machines relating to one base box up and running. Will try the one linked though, too.
Looking quite good on a Friday afternoon!
Entering python on my new ubuntu box gives me
Python 2.7.3 (default, Apr 20 2012, 22:44:07)

[GCC 4.6.3] on linux2

Type "help", "copyright", "credits" or "license" for more information.

>>>
Great! Latest 2.7.3 without even installing anything. Let’s see how the apache looks or if one is installed… apache2ctl reveals
The program ‚apache2ctl‘ is currently not installed. You can install it by typing:
sudo apt-get install apache2.2-common
Nice. Installing a full apache setup with mysql and php is done in under 5 minutes. Nice again.
Cleaning up the mess is even faster.
vagrant destroy annd everything is back to normal/default. Great! Now I create different setups and see which works best. Hell i could even create a shell script to automate setup of a certain box configuration. Nice. Har, har and that’s what vagrant is calling Provisioning. How cool is that please?
Tinkering with vagrant & virtualbox… awwwwwwwwwwwwwwwwww!!!!
I will never switch back to anything else. Having downloaded
http://s3.amazonaws.com/GSWD/gswd-vagrant.zip which gave me a completely configured setup for python/django production deployment made me smile again. Hell it’s now as easy as having a „Vagrant-folder“ with a „Vagrantfile“ inside to setup stuff. OMG.
And BTW the documentation on getting started at http://docs.vagrantup.com/ was one of the best I have ever had the pleasure to read.
![]() Keep in mind to improve python skills. But how about really getting things going with deployment of an actual python app?
Keep in mind to improve python skills. But how about really getting things going with deployment of an actual python app?
Oh and why not start using an IDE for this too? Like e.g. PyCharm? Downloaded. Installed. Works. Great. :-)
Using the VM of VirtualBox which was perpared by Vagrant it seemed to be easy to also activate mod_wsgi… but it wasn’t. I fiddled with nearly everything… but did not get it to run. Basically because all error messages which were generated were basically not telling me which error I have and how I could fix that.
<Directory /var/www/python/>

  Options ExecCGI
AddHandler cgi-script .cgi
AddHandler wsgi-script .wsgi
AllowOverride None
Order allow,deny
allow from all
</Directory>
Some test.wsgi was working, yeah, but my project’s wsgi-file did e.g. not end with the .wsgi-suffix but instead was named wsgi.py. But that is by far not all of the weirdnesses around deployment.
At first I was using regularly to check if the module was really running:
apache2ctl -t -D DUMP_MODULES
In the end I was stranded in deployment hell..
Deploying Django perhaps could be made easy, but it isn’t. I suffered a lot the last 7 days! A HELL OF A LOT! I do not know if it was worth it. I am frustrated like hell. We have the year 2014 and all we have is a ballpark full of weird different technologies which in a way all do the same. We have thousands of different operating systems (OS X, debian, ubuntu, etc.), thousands of different webservers (apache, nginx, lighthttpd, etc.) we have thousands of different ways to let a webapplication interact with these webservers (mod_python, mod_wsgi, cgi-scripts, etc.) we have a zillion different python versions and fucking weird COMPILED mod_$fuck.so modules for apache which by accident NEVER are compiled in the version you actually need for the distribution which is at work on your server… It. Is. One. Frustrating. Shit. Of. A. Hell.

Source: Smiley – Current Status: Super Sad
I am really SO close to give up on this. I mean I am not stupid, I try to learn… but this is such a huge mess WebObjects deployment now really looks easy. WebObjects Development not looks supereasy. Perhaps I should give ProjectWonder another try…
Har, har… got it to run!
ubuntu 12, apache, python, django, mod_wsgi, vagrant, virtualbox, the whole shit. :-)
To be continued… in part 2. (See next blog post!)
Why do I blog this? Documenting my own progress was fun. At the same time it kept me going. And now I can also check back on all the errors I made. Seeing one’s own progress makes you confident to proceed. So now I will gear up and take the documentation as my next source of learning. I want to get stuff done! Nearly all issues I had during the tutorials were solved by my generic problemsolving skills. So I guess I am prepared to do the next steps. I am a bit afraid of the really awful {% %}-notation in templates, but I hope to not spend too much time there since I want django to be a first class REST-backend in the first place, so not many templates will be needed with some luck.
Hi Helge,
Just making a few comments with things that may help you: Feel free to ignore them.
– MySQL is a pita – and the python adapter is poorly (i.e. not) maintained. Sqlite is great when you’re just playing with things locally, and you can get a long way with that, just don’t push anything into production using it. If you want to use a production db, personally I’d take a look at Postgres – it’s much more friendly. Postgres can be „no config“ installed with Postgres.app – http://postgresapp.com/
– Kenneth Love’s tutorials will help a lot – they’re all up to „best modern standards“ and should teach you about virtualenv (which means you don’t need sudo pip) and so on – by using a vagrant box you just save yourself damaging your own box.
– With a virtualenv set up (basically an isolated python environment) you shouldn’t ever need to worry about PYTHONPATH directly – you say „I’m in this virtual env“ and install everything into there, and so long as your terminal is in that env everything with „just work ™“. It also keeps things isolated so you can run different versions of packages for different sites.
– When you come to building your REST API – take a look at http://django-rest-framework.org/ which is one of the best third party libraries for doing this kind of thing. You’ll find the biggest strength of django is the wealth of third party apps – all of which are just a „pip install“ away.
Hope that helps, and you continue to do work with Django. If you need help, you already found #django to be helpful – for a slower feedback loop the django-users maillist on google groups is similar.
Marc
@Marc: Hey Marc, thanks a lot for the helpful advice. If you are involved with the tutorial, thanks again for a great tutorial. Don’t be too serious about my rants though, learning is often also an experience which only works through frustration of failing. I failed a lot during the tutorial but more on general unix issues (like the mySQL) and general python issues (like this package manager stuff and learning the language).
Extra thanks for pointing me towards the REST API in django. I will give it a try asap but first need to manage a full deployment cycle with a simple app first. So thanks again!